Goddess braids is an excellent protective hairstyle that comes in a variety of patterns and creates stunning looks. One of the best ways to style goddess braids is to weave in kanekalon hair that will add fullness and bright touch to your ‘dos. In this article, I will provide you with a step-by-step guidance, pictures and video tutorial so that you successfully master making goddess braids with kanekalon for yourself or your daughter.

Goddess braids are very close to cornrow braids, the only difference being that gotti braids are thicker and raised higher. Again, both goddess locs and cornrows resemble French braids as they are braided close to the scalp. However, unlike in French braids, threads are crossed under, not over, each other, which makes the braid look tighter and stick out from your head.
Another source of confusion is what type of hair you need to create goddess braids. While stylists claim that it’s possible to get gotti braids with your own hair, a few women and girls have hair that is thick enough to achieve full, voluminous braids. So to end up with the hairstyle that looks really goddess-like, you will need to “feed in” some synthetic hair (I will soon show you how).
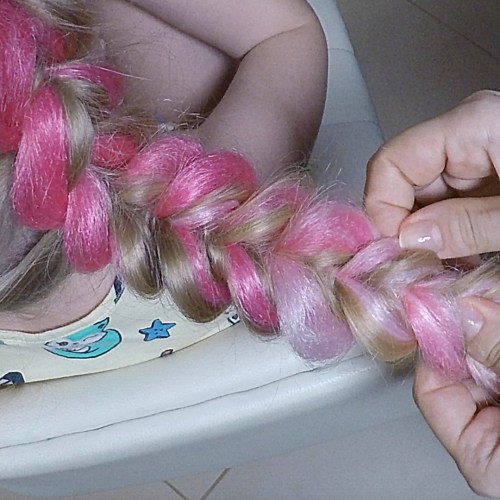
Kanekalon hair is a relatively cheap and lightweight option, which is why it is the number one choice for feed-in braids. This tutorial features pink kanekalon hair that allows making goddess braids with color, but you can actually choose any other type of hair extensions for braiding and use the color matching your natural hair.
If you want to do two goddess braids, it doesn’t necessarily mean you need two packs of synthetic hair. In fact, I use one pack split into four strands for this hairstyle. How do you decide how much braiding hair you need then? The thinner your hair is and the fuller braids you want to achieve, the more kanekalon you need.
Let me show you an easy way to weave in kanekalon into goddess braids that can work fine even for those who are not good at classic French braiding. Here are 7 steps to follow.
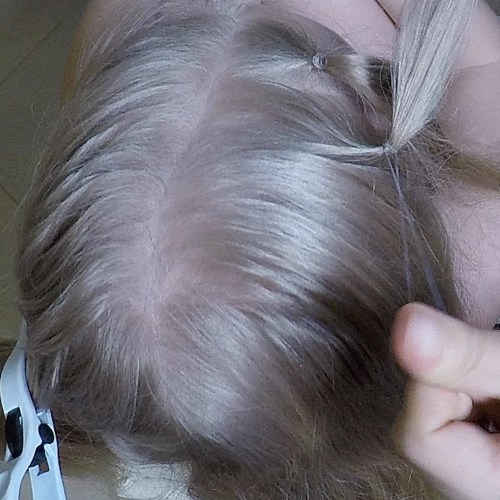
Start goddess braids by parting the hair in the middle and combing it thoroughly to get rid of any tangles. You may also spray hair a bit to tame down flyaways. Divide kanekalon hair into four equal strands as shown in the photo. For each braid, you will need two strands of kanekalon.

Fix one part of your hair with a hair clip so that it does not interfere with the process of weaving. On the loose part of your hair, make two separate thin ponytails in the front, fixing them with elastic bands.
Next, take one strand of kanekalon and attach it with an elastic band to the ponytail. Make sure the strand of kanekalon makes two parts of equal length. Attach another strand of kanekalon with an elastic band to the second ponytail in the same way.

Distribute hair in the first ponytail between two strands of kanekalon. Then, put these two strands around the second ponytail that has kanekalon attached to it, pull them into a new tail, and secure with an elastic band.

Now, divide the strand, which is in the middle, into two equal parts and circle them around the tail you have made during the previous step. Add some loose hair and fix it with an elastic band.

Continue braiding putting two strands around the tail you have got and pulling them with some loose hair into a new ponytail. When you run out of hair, tie a band around the end of the braid.

Pull out the strands of the braid to make it look more voluminous. If you want to accent the color you feed in, pull kanekalon to the front, pushing your hair behind it.
The second goddess braid is created in exactly the same way. The hairstyle you should get in the end is one of the best braid styles for girls and ladies that are not afraid of attracting attention with some bright, distinctive ‘dos.

For more details on this braiding technique, see the video tutorial:
Do not limit your creativity with two goddess braids! You may use the same feed-in method to create a single braid with a weave or twist the ends of the braids into a bun, creating an intricate updo with kanekalon.
The benefit of this hairstyle is that you can actually wear it for days and even weeks. Just wrap your hair with a silk scarf for sleeping and apply some dry shampoo or its substitutes to keep your hair fresh.
Did you like this goddess hair braiding tutorial? Follow @sveta_kosaplet on Instagram for more braiding ideas.


